Showing posts with label DIY. Show all posts

Monday, January 26, 2015

Gel Nail Fake!! *How To Make Your Normal Polish Look Like Gel Nails*


Gel nails have been very popular this last year, and the trend continues into 2015, but gel polish is extremely HARD on your nail! Gel polish makes your real nails look incredible, without the use of acrylic or any "artificial nails", but once you decided you don't want the gel anymore it becomes a huge problem for the health of your nails. 
I have extremely brittle, peeling nails naturally , so quite a few years ago I had acrylic nails for over 3 years straight.
Here is a picture of what my acrylic nails looked like. So beautiful, but so terrible for the health of my nails.

 Then after "gel nails" became popular I decided to give it a try. I had heard how great it was for your nails, protecting your natural nails, and no use of acrylic. So the shape of my nails was the ACTUAL shape of my nails! So, I had my acrylics taken off, and replaced with gel. No chipping, longer wear time, healthy for your nails, is what they claimed. Who wouldn't want that? I soon came to realize because my nails were so brittle and peeling to begin with, the gel did not work well with me. After just a week I had peeling and chipping. What a rip off? So I decided that I needed to remove the gel and get my natural nails healthy. 
What I quickly found out was that removing gel polish is NOT an easy or painless process... After long hours of soaking and peeling and scrubbing I finally got off all of the gel. I soon would realize the horror of this product. My nails were shot. Peeling, breaking, aching, throbbing, thin, brittle nails is what I was left with, worse than my nails were after getting my acrylics taken off. 
I then decided that this was the time I needed to make my natural nails healthy. So after a few years of clear coats, and buffing, and maintenance my nails were in a decent state. Sill peeling, still quite brittle but I could work with it.

I've found the perfect combination of products to recreate that beautiful gel nail look, without ruining your nails. This regimen actually HELPS your nails! Now, the wear time is not as long as gel nails, but with a sacrifice of doing my nails ever week and a half my nails are healthy, and I get complimented on how great they look.
I get asked constantly if my nails are gel, or if they are my real nails! 

Here are the products I use to create the illusion of gel nails...

 I always start with the Instant Artificial as my base coat. One layer, and let it completely dry before moving on. I get this a Sally's Beauty Supply!! It's very affordable!

Next I move onto my Revlon Colorstay Polish. This is the BEST polish I've ever used and will never use another brand. It is amazing on its own or in combination with these other products! I only use 1 coat of this because the pigmentation is so great!

Next is my Seche Vite top coat! This is amazing stuff! Gives your nails that "Gel Polish" shine, and it is quick drying!!


Wednesday, November 19, 2014

Christmas Decor in an Apartment!


It's the Holiday Season!! I know it's not even Thanksgiving yet, but it seems like everyone is getting a head start on the Holidays this year. Decorating your home for the Holidays is one of the most nostalgic and heart warming activities, but it can be difficult for those living in a small apartment to get the same back home feel. It's hard to decorate an apartment in general just because of all of the rules you may have to abide by, such as not drilling holes in the wall to hang things, or painting the walls. In our case our apartment was already painted when we moved in...honestly I would rather have all the walls white, but that was not my choice. So I'm stuck with a medium warm toned tan color..yuck. So decorating can be difficult, but luckily I found the perfect Holiday decor to match our wall color and our personal style! All at a decent cost! In this post I'm going to be listing all the items we bought, and (estimating if I don't remember) how much each item costs! Hopefully this gives you some inspiration and an idea of how much money you may have to spend! Keep in mind this was our FIRST Christmas/Holiday Season we had to decorate our own apartment, so we were starting from scratch! 
Enjoy:)  

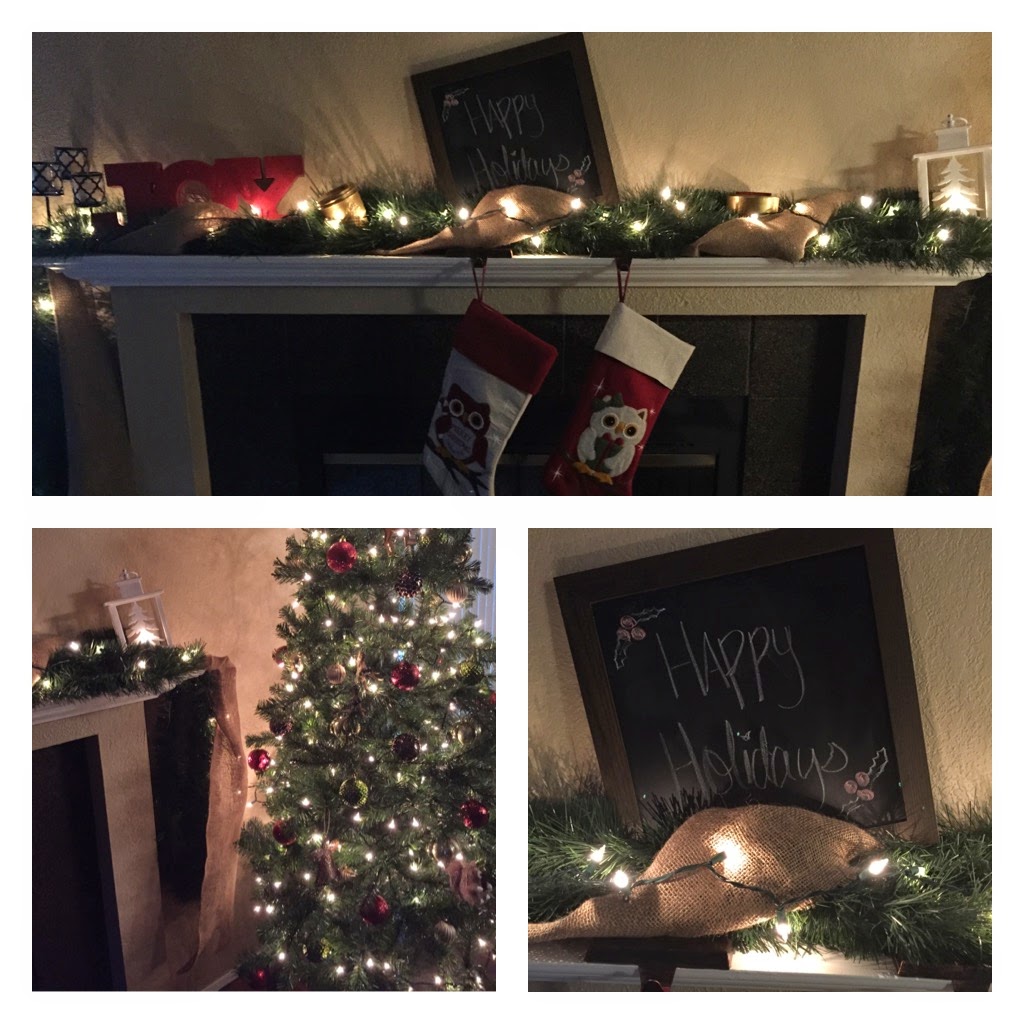
Starting off, here is a little bit of an overview of what most of our Holiday Decor looks like! I'll be going through each item! 
 ALL ABOUT OUR TREE!
Artificial 7' Tree - Target $53
We desperately wanted a real tree for our first Christmas but in an apartment an artificial tree is much more practical, and you can have it displayed for SO MUCH LONGER than a real one! And keep it forever! Woohoo!
String Lights(300) - Walmart $7
This was the PERFECT amount of lights for this tree. We barley had enough which was great because then we didn't have to figure out what to do with the extra!  
Ornaments(50) - Walmart $16.98
I originally bought 2 of these but ended up returning one because I only needed 50.
Star Tree Topper - Walmart $8
We really loved this topper because we thought it really pulled everything together.
Individual Personal Ornaments(4) - Walmart $1.97 each


Mantle Decor!
 Garland - Target $10
This garland ended up being SOO long when we took it out of the package, but it ended up being perfect! We folded it 3 times then laid it across the mantle, cutting the loops in the end making 3 separate strands.  
Burlap - Walmart $7
We ended up cutting this burlap piece in half long ways so we had 2 skinny pieces, then wrapped it around the garland!
String Lights(50) - Walmart $4
This was the PERFECT amount of lights. We ended up just laying the lights on top of the garland instead of wrapping it.  
Stockings - Walmart $8 each
 We couldn't find decently priced stockings we both really loved so we decided to stick with something that would match the colors of our decor the best out of the ones we did find!
Stocking Holders - Target $8
We picked up the Brass colored stocking holders to blend in with the garland and burlap. They work great so far! We will see how they hold up once the stockings are full with treats!
White Lantern - Target $12
I knew from the start that I wanted to get a lantern. I absolutely love this lantern and I will probably leave it up most of the year! It is battery operated and the candle inside flickers!
Chalk Board - Walmart $7
From the beginning I also knew I wanted to get a chalk board. I think they are so versatile and can be used all year round! Definitely an essential to Christmas photos also! 
Light-up JOY - Target $20
I was so over JOYED ;) when I saw this. I knew I had to have it, and I know I will be using it for years. It is battery operated.
Black Pedestal Candles - Target $10 
I previously owned these and have had them on my mantle for about a year. I absolutely love them and love the little accent it gives!
Gold Kerr Stacking Jars - Previously owned
I love reusing old jars for decor. I had these jars and painted them gold a few months ago, and I discovered they were the perfect finishing touch to my mantle decor!


Wrapping Paper!
Don't spend all your money on wrapping paper, go to the Dollar Store! I found this paper along with another that corresponds with it at the Dollar Store! So cute, festive, and classic!

So our grand total for our Holiday Decor was around $190! 

Hope you enjoyed today's post!
Happy Holidays!
 

Tuesday, October 14, 2014

Spooner Farms Harvest Festival Puyallup, Wa


 "Spooner Farms Harvest Festival" located in Puyallup, WA was the absolute BEST Pumpkin Patch/Harvest Festival I've ever been to. The atmosphere was perfect for all ages! We had such an amazing time and I wanted to share our experience with you! If you live in Western Washington I HIGHLY recommend visiting this destination, especially if you have children! I've included the "2014 Fall Harvest Festival Flyer" so you can see just how much stuff Spooner Farms has to offer! Not only is this a great place during Fall time but all year round!This was our first visit to the Farm, but definitely not our last! Here are some photos of our adventure! Also I added the photos of our pumpkins we got there and how we decorated them. As well as a Yummy Baked Pumpkin Seeds Recipe! All photos were taken with my new iPhone6!
Enjoy!

"Carmel Apple Reflection"


 "Corn Maze Selfies"


"Silly Toothed Pumpkin"

 "Free Hand Monogrammed Decorative Pumpkins"


"Yummy Baked Pumpkin Seeds"
After carving your pumpkin and separating out the seeds from the meat, rinse the seeds; removing all pumpkin meat from the seeds. Pat the seeds dry with paper towels and put into a mixing bowl. Preheat oven to 325. Into your mixing bowl add 2 Tablespoons of Butter(or olive oil) Salt, Garlic Salt(optional) Spicy Seasoning(optional) Give it a good stir, making sure to coat all the seeds, then spread onto a baking sheet. Roast in the oven for about 40 minutes stirring half way through!


Hope you enjoyed today's post!